|
|
|
Setting Up MS DNS
This applies only to Microsoft DNS server as included with Windows NT 4.0. If you want to set up Bind for NT
First you have to have a domain. In this example, I will use "Hnd.com". It is possibly out there on the Internet.
1.
Next you have to
decide if you are going to do Reverse Lookup. This is where someone can query a
given IP address and get the host name, exactly opposite of the normal way you
use DNS. Most people do since it is required to send mail to some domains trying
to prevent spam.
2.
So if you're going
to do reverse lookup, you must know the name of the zone. The way to do this is
to evaluate your IP subnet. I have seen some name it
1-127.2.31.172.in-addr.arpa, and that will NOT work. You must name it according
to the closest class C your network falls into, or class B, if applicable, then
drop the octet(s) that would be 0 if you were to just write down your network
address. I know this is confusing. Check out these examples:
192.168.100.0 = 100.168.192.in-addr.arpa
152.12.0.0 = 12.152.in-addr.arpa
10.0.0.0 =
10.in-addr.arpa
(MS DNS will allow you to use the 0's in the last octets, but the standard
is to not use them)
3.
Open DNS Manager. It
can be found in Administrative Tools.
4.
If you have never
used DNS Manager before you will not have any servers in the left pane.
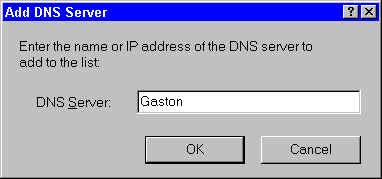
Right-click the "Server List" icon or phrase. Choose "New
Server". Put in the IP address or the Net BIOS name of the server. No, the
DNS name will not work.
5.
Create your
reverse-lookup zone. We do this first for reasons, which will become apparent
later. Oops, I already
set up my domain before I read this and now I need to set up my reverse lookup
zone.
6.
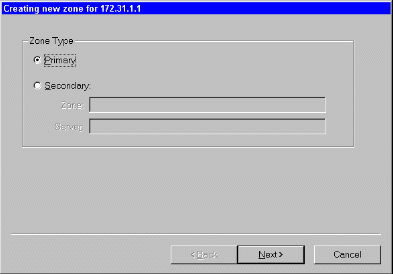
From the DNS menu,
choose New Zone.
7.
Choose Primary for
the zone type.
8.
Click Next.
9.
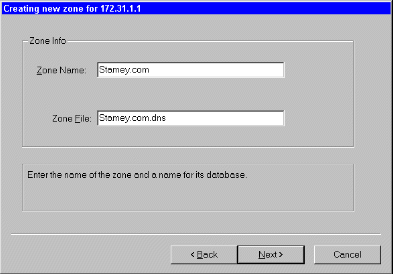
In the "Zone
Name" text box, type in your reverse-lookup domain name. If you
don't know this already go back to step 3. When you click on the text box for
the Zone File, MS DNS will then fill in its suggested file name. I always
replace the "dns" MS DNS appends to the end of the domain name to
"txt". DNS does not care what the name of the file is and if you need
to open the file in Notepad for some reason, it will automatically be associated
already.
10.
11.
Now click Next. You
will then see the Finish form of that dialog. Click Finish. You will now see the
new zone and default records, the SOA record for that zone and the NS record for
that zone.
12.
Now you can now
create your regular zone.
13.
From the DNS menu,
create a new zone again.
14.
Choose Primary and
click Next.
15.
This time, fill in
your domain name. Again, when you click the "Zone File" text box, MS
DNS will suggest the file name. Again, you can name it anything you want, but
I'd put a "txt" extension on the end.
16.
Click Next and
Finish and you're done creating the zone for that domain.
17.
Now we need to add
hosts and mail records.
18.
From the DNS menu,
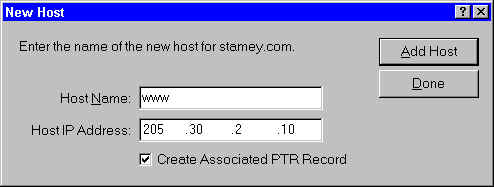
choose "New Host. You will see
19.
You do not add the
entire host and domain name here. You only enter the name of the host, such as
"www" or "mail". The reason is that DNS appends the domain
name to the end of the host name automatically. It isn't case specific so enter
it any way you'd like. You also need to enter the IP address of that host. Now,
notice at the bottom, the check box that says "Create Associated PTR
Record". This is your reverse lookup record. MS DNS will NOT automatically
add this record if you have not created your reverse lookup zone for the subnet
of the IP address of the host you just entered. See, I told you it would become
apparent.
20.
Now click "Add
Host".
21.
Add other hosts,
such as "mail" and "ftp", etc.
22.
Note: You can have
more than one record for a given IP address, mail.hnd.com and www.hnd.com can
have the same IP address. Many administrators do not do this because they
can't do it on the reverse lookup, but if you do not have enough IP addresses,
or one server hosts mail in addition to your web server, you must do this.
23.
The Mail records.
24.
Choose the domain
you want to create mail records for. Choose New Record from the DNS menu.
25.
In the dialog box
that opens, scroll down in the Record Type list and choose "MX
Record".
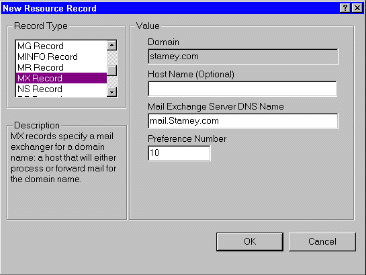
![]() Enter the mail server's name in the "Mail Exchange Server
DNS Name" text box. Enter the "cost" in the "Preference
Number" text box.
Enter the mail server's name in the "Mail Exchange Server
DNS Name" text box. Enter the "cost" in the "Preference
Number" text box.
![]() You must enter a number here. In some cases you may have another
mail server, such as a backup server that can receive mail for your server if it
is down. In that case, you would add another mail record, naming the back up
server, giving that record a higher cost.
You must enter a number here. In some cases you may have another
mail server, such as a backup server that can receive mail for your server if it
is down. In that case, you would add another mail record, naming the back up
server, giving that record a higher cost.
![]() This way, the mail server querying DNS will try to send the mail
the the lowest cost server first. If that server is not available, the sending
mail server will send it to the next higher cost mail server it has records for.
This way, the mail server querying DNS will try to send the mail
the the lowest cost server first. If that server is not available, the sending
mail server will send it to the next higher cost mail server it has records for.
![]() Click OK.
Click OK.
![]() If you enter a name in the "Host Name (Optional)" text
box, you may not get the results you want. Let's say you entered
"mail". Now your new record points mail destined for "mail.hnd.com"
to the specified mail server. Remember that part about DNS appending the domain
name to the end of the host record you enter, step 18?
If you enter a name in the "Host Name (Optional)" text
box, you may not get the results you want. Let's say you entered
"mail". Now your new record points mail destined for "mail.hnd.com"
to the specified mail server. Remember that part about DNS appending the domain
name to the end of the host record you enter, step 18?
26.
NS records. NS
record are Name Server records. You can specify the other DNS server(s) for this
zone by adding NS records for each DNS server that is a secondary for this zone.
Do the Add Record from the DNS menu and them put in the fully qualified name of
that DNS server, such as NS1.myisp.com.
27.
CNAME records. A
CNAME record is kind of like an alias name. It is just a record that points to
another name, not an IP address. You may need this if you decide to change a
name on your network and want the old name to work for a while as people make
the transition.
![]() Note: You cannot use a CNAME record for your mail server. This
will cause problems with DNS and mail servers attempting to send you mail. This
has to do with the way the early mail server software was coded, and it would
not look for aliases, only Canonical names.
Note: You cannot use a CNAME record for your mail server. This
will cause problems with DNS and mail servers attempting to send you mail. This
has to do with the way the early mail server software was coded, and it would
not look for aliases, only Canonical names.
![]() As the DNS bible recommends, it is not wise to use a CNAME for
any resource records.
As the DNS bible recommends, it is not wise to use a CNAME for
any resource records.
28.
There are other
types of records, but you're going to have to hunt them down in Help or buy a
book. What's on this page will get you into production just fine.
You are now ready to set-up your web site with MMS
Context
Based Servers Reverse
DNS DNS
Terms DNS
Concepts
Setting-up
MS DNS