|
|
|
In
order to use the networking features and components included in Windows 98, you
must first select, install, and configure them. This lesson discusses the
procedures for installing and configuring network components.
You
start the process by giving your computer a unique name to ensure that other
computers on the network will recognize it. You install the hardware and
software that enables your computer to connect to the network, and then you
configure the protocol that your computer uses to communicate with other
computers on the network.
After
this lesson, you will be able to:
·
Identify a computer on a network.
·
Assign a computer name.
·
Install and configure a network
adapter card.
·
Install network protocols.
·
Configure TCP/IP.
·
Troubleshoot TCP/IP.
·
Configure network bindings.
Identifying
Your Computer on the Network
In
order to connect a Windows 98 computer to a network, you must provide a way for
the computer to identify itself. You do this by assigning it a unique name.
Assigning
a Computer Name
Each
Windows 98 computer on a network uses a unique name to distinguish it from all
other computers connected to the network. If another computer, workgroup, or
domain on the same network has the same name, your computer cannot communicate
on the network. Your computer name can have up to 15 characters, and should
contain no blank spaces. Although Windows 98 allows you to enter spaces in a
computer name, spaces can cause problems with network connectivity. For example,
MS-DOS clients cannot connect to a computer with spaces in its name. The names
are not case sensitive.
Workgroup
In
addition to the computer name, you must also specify a unique workgroup name.
The workgroup name, which is used for organizational purposes only, defines your
Network Neighbourhood. Whenever you explore the Network Neighbourhood on the
desktop, the computers it displays are those that have the same workgroup name
as your computer.
You
should assign a common workgroup name to computers that share resources such as
files and printers with each other. For example, you can assign a common
workgroup name to computers that belong to a single department, project, or
site.
Computer
Description
You
may also enter an optional description of your computer. The description will
appear to anyone browsing the network, but it has no other function.
If
you want to assign a name to your computer, perform the following procedure:
1.
Choose Start, Settings, and then
Control Panel.
2.
Double-click the Network icon and
click the Identification tab (see Figure 8.1).
3.
Enter a computer name, workgroup
name, and computer description for your computer.
4.
Click OK.

Figure
8.1 Identifying your computer
on a network
Installing
and Configuring Network Adapter Cards
You
must install a network adapter card that the computer uses to interface with the
network. This card provides the physical connection to the network type, media,
and protocols.
Windows
98 supports a wide range of network types including:
·
Ethernet
·
Token Ring
·
Attached Resource Computer network (ArcNet)
·
Fiber Distributed Data Interface (FDDI)
·
Wireless technologies, including
infrared
·
Asynchronous Transfer Mode (ATM)
Windows
98 supports up to four network adapter cards in a single computer. After you
physically install the drivers for the network adapter card in the computer, you
can install the adapter and configure it for Windows 98 using the Add
New Hardware Wizard or the Network
icon in Control Panel.
Figure
8.2 Installing a network
adapter card
Windows
98 automatically assigns the interrupt request line (IRQ) and input/output (I/O)
address for the adapter, or prompts you to confirm those resources if it cannot
determine what resources to use.
If
you want to install and configure a network adapter, perform the following
procedure:
1.
In Control
Panel, double-click the Network icon.
2.
On the
Configuration tab, click Add.
3.
In the Select
Network Component Type dialog box, click Adapter,
and then click Add.
4.
Choose the manufacturer and adapter,
and then click OK (see Figure 8.2).
5.
Click OK
to close the Network properties sheet. After copying the files needed to
support the adapter, Windows 98 may prompt you to confirm or change resources
for the adapter if there is a conflict. If there are no conflicts, the program
will prompt you to restart the computer.
6.
After the computer restarts, you can
configure the adapter by returning to Control Panel and double-clicking the
Network icon.
7.
Click the adapter, then click
Properties. Depending on the adapter, you can change the driver type and the
binding.
NDIS
Windows
98 uses the Network Device Interface Specification (NDIS) to support adapter
cards. NDIS is an industry-standard device driver specification that is
independent of both the network protocol and the adapter card. NDIS allows a
network adapter card to use more than one protocol. Windows 98 supports NDIS
2.0, 3.1, 4.0, and 5.0 drivers. NDIS 5.0 supports a wide range of network media
including Asynchronous Transfer Mode (ATM) and wide area network (WAN)
technology. NDIS 5.0-compliant drivers also provide performance improvements,
including NDIS power management.
Important
If your network adapter card does not support NDIS 5.0, contact the
manufacturer for an updated device driver. For more information on NDIS 5.0,
refer to Appendix H, "Introduction to NDIS 5.0."
This
course does not discuss earlier NDIS-compliant drivers or Open Data-link
Interface (ODI) drivers. For more information on configuring these types of
network adapters, refer to the Microsoft Windows 98 Resource Kit.
Installing
Network Protocols
In
order for two computers to communicate on a network, they must use a common
network protocol.
If
you want to install a network protocol, perform the following procedure:
1.
Open Control Panel and double-click
the Network icon.
2.
On the Configuration tab click Add.
3.
In the Select Network Component Type
dialog box, select Protocol and click Add.
4.
Select the Manufacturer and Network
Protocol you want to add and click OK (see Figure 8.3).
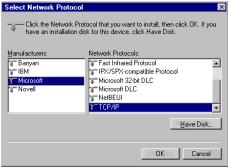
Figure
8.3 Installing a network
protocol
Windows
98 can accommodate multiple protocols on a single computer including:
·
NetBIOS Enhanced User Interface
(NetBEUI)
·
Internetwork Packet
Exchange/Sequenced Packet Exchange (IPX/SPX)
·
Microsoft Data-link Control (DLC)
·
Transmission Control
Protocol/Internet Protocol (TCP/IP)
·
Fast Infrared Protocol
In
addition, Windows 98 supports Asynchronous Transfer Mode (ATM) using software
components that are installed as protocols.
NetBEUI
NetBIOS
Enhanced User Interface (NetBEUI) is a fast protocol often used in small
networks. Because it does not support routing, NetBEUI is not appropriate for
large networks. However, NetBEUI is easy to administer because it has no
required configuration. For this reason, it is a good choice for small networks
that do not use routers.
IPX/SPX-compatible
Protocol
The
Internetwork Packet Exchange/Sequenced Packet Exchange (IPX/SPX)-compatible
protocol is a routable protocol primarily used in a Novell NetWare environment.
Because IPX/SPX is not as fast or as universal as TCP/IP, another routable
protocol, IPX/SPX is not recommended for use in a non-NetWare environment.
DLC
Microsoft
Data-link Control (DLC) is used primarily to communicate with various IBM
mainframe and AS/400 computers using the same network adapter architecture. You
also can use DLC to print to printers connected directly to the network instead
of to a port on a computer acting as a print server.
Although
you can install DLC on a Windows 98 computer, you cannot use it to communicate
with other Windows 98 computers.
Windows
98 includes both 32-bit and 16-bit DLC drivers. If possible, you should use the
32-bit driver for increased performance and stability.
TCP/IP
The
Transmission Control Protocol/Internet Protocol (TCP/IP) protocol suite is a set
of standard protocols and utilities most often associated with the Internet. It
is fully routable and is often used as a basis for wide area networks (WANs).
Fast
Infrared Protocol
Fast
infrared protocol can give a computer wireless LAN access. This protocol
supports devices with a throughput of up to 4 Megabits per second (Mbps).
Throughput is a measure of the data transfer rate through a typically complex
communications system or of the data processing rate in a computer system.
ATM
Asynchronous Transfer Mode (ATM) is a high-speed network technology
capable of transmitting data, voice, and video traffic in real time using
fixed-length packets transmitted over reserved network bandwidth.
ATM
is a connection-based protocol and therefore must establish a connection before
transmitting any data. Three components-ATM Call Manager, ATM Emulated LAN, and
ATM LAN Emulation Client-provide a bridge between connectionless protocols such
as TCP/IP and IPX and ATM, enabling them to function transparently over ATM
networks.
ATM
Call Manager
This
level establishes the connection (initiates the call) and communicates with the
switch (hardware that is analogous to a hub in an Ethernet environment). This
level also is called the User Network Interface (UNI). Both the call manager and
switch must conform to the same UNI specification, which in Windows 98 is UNI
3.1.
ATM
LAN Emulation Client
This
core component of the ATM topology facilitates communication between the ATM
driver and NDIS. Windows 98 supports LAN Emulation (LANE) Client 1.0
specification, to which the switch also must conform.
ATM
Emulated LAN
This
layer is used to set up Virtual local area networks (LANs)-VLANs. You can set up
bridges to other network segments or partition part of the ATM network to form a
smaller segment. For example, on a 10-machine, ATM-only network, you can set up
a VLAN to include only five machines. You can then set up the Emulated LAN (ELAN)
client to use only the machines listed in the VLAN.
Configuring
TCP/IP
The
Windows 98 implementation of TCP/IP includes the standard suite of TCP/IP
protocols, and is compatible with other TCP/IP-based networks. Standard TCP/IP
protocols include:
·
Internet Protocol (IP)
·
Transmission Control Protocol (TCP)
·
Internet Control Message Protocol (ICMP)
·
Address Resolution Protocol (ARP)
·
User Datagram Protocol (UDP)
TCP/IP
requires configuration before it can be used to communicate on a network. At the
least, each network adapter you install in the computer requires an IP address
and a subnet mask. The IP address must be unique among the computers on the
intra- or inter-network, or TCP/IP will not initialize. A subnet mask is used to
distinguish the network ID from the host ID, so that TCP/IP can determine
whether an IP address is located on a local or remote network.
Assigning
an IP Address
You
can assign the IP Address and subnet mask automatically using Dynamic Host
Configuration Protocol (DHCP) or you can assign the IP address manually.
Figure
8.4 IP Address tab on the
TCP/IP properties sheet
If
you want to assign an IP address, perform the following procedure:
1.
Open Control
Panel and double-click the Network
icon.
2.
On the
Configuration tab, click the TCP/IP listing for the network adapter you have
installed.
3.
Click on
Properties. The TCP/IP Properties dialog box appears.
4.
On the IP
Address tab (see Figure 8.4), choose one of the following options:
·
Obtain an IP address
automatically\Windows 98 can obtain TCP/IP configuration information
automatically via DHCP. Choosing this option requires that a Windows NT Server
computer or any other computer running a DHCP Server service or maintenance
utility program (called daemon for UNIX computers) is available on the network.
A Windows 98 computer cannot act as a DHCP server.
·
Specify an IP address
If
you do not have a computer on your network that can act as a DHCP server, or if
you need to assign a permanent, static address to your computer, you should
specify an IP address and subnet mask manually.
Important
If you use a static IP
address, make sure the address is accurate. If you assign an incorrect number,
your computer may not be able to communicate on the network. You could also
prevent another user from being able to use the network.
5.
Click
OK.
6.
If you need to assign a gateway
manually, return to the TCP/IP
Properties dialog box, click the Gateway
tab, and enter the number you wish to assign.
7.
Click OK.
8.
If you need to enable a Windows
Internet Naming Service (WINS) server, return to the TCP/IP
Properties dialog box, click the WINS
Configuration tab, and click Enable
WINS Resolution and enter the appropriate WINS server information.
9.
If you need to enable a domain name
system (DNS) server, return to the
TCP/IP Properties dialog box, click the DNS
Configuration tab, click Enable DNS,
and then enter the appropriate DNS server information.
10.
Click OK.
Obtaining
an IP Address Automatically
If
the Windows 98 computer has access to a DHCP server, then during system startup,
the Windows 98 computer receives an IP address, subnet mask, and other optional
parameters from the DHCP server. This simplifies TCP/IP configuration,
especially for mobile computers. For example, using DHCP (see Figure 8.5), your
notebook computer can move from subnet to subnet or intranet to Internet, and be
assigned a valid TCP/IP configuration automatically. If the DHCP servers are
configured properly, each client will receive a unique IP address.
Figure
8.5 Obtaining an IP address
from a DHCP server
In
the absence of a DHCP server, a Windows 98 feature called Automatic Private IP
Addressing provides support for automatic IP address assignment. When a computer
running Windows 98 starts with TCP/IP configured to obtain an address
automatically, Windows 98 will first attempt to locate a DHCP server for the
address assignment. If Windows 98 fails to locate a DHCP server, the operating
system will use Automatic Private IP Addressing. This new Windows 98 mechanism
causes the computer to assign itself an IP address in the form of 169.254.x.x.
Windows 98 will continue to use this address until it detects the presence of a
DHCP server.
Automatic
Private IP Addressing can automatically assign a TCP/IP address to a computer
running Windows 98, but it does not generate all of the information typically
provided by a DHCP server that uses a name resolution system such as DNS and
WINS. Consequently, computers enabled with Automatic Private IP Addressing can
communicate only with computers that also have addresses of the form
169.254.x.x; that is, they can communicate only with other computers enabled the
same way. Computers that obtain their IP address through Automatic Private IP
Addressing cannot communicate with the Internet without a Proxy or Network
Address Translation (NAT) gateway.
Assigning
a Gateway
In
order to access computers on other subnets, your Windows 98 computer must be
configured for one or more gateways, a combination of hardware and software that
connect two different types of networks. Although you can have as many as eight
gateways in the Installed Gateway list (see Figure 8.6), the gateway at the top
of the list is your default gateway and will always be used if it is available.
Figure
8.6 Configuring your computer
for gateways
If
you are using DHCP, a DHCP server probably assigns your gateway assignment.
Because gateways entered manually will supersede the ones assigned through DHCP,
if you manually enter a gateway assignment, be careful not to override the DHCP-provided
default gateways.
Using
WINS Server for Computer Name Resolution
Because
TCP/IP uses IP addresses rather than computer names for interconnectivity, you
need either DNS or a WINS server in order to connect to another computer by
specifying its computer name.
If
you enable WINS resolution, you can specify the name of a WINS server on which
your computer will register its computer name and IP address at system startup.
When you attempt to connect to another computer running Windows 98, your
computer will query the WINS server to find out the IP address of the remote
computer.
Without
a WINS server, you need to maintain a text database file that contains computer
names-to-IP address mappings to connect to computers on remote subnets.
Note
You can browse your own
subnet without enabling WINS or having the text database file.
Using
DNS for Computer Name Resolution
DNS
is a hierarchical naming system that uses a combination of text names separated
by periods to create a unique name, such as example.microsoft.com. The DNS
server contains a database that converts the name assigned to your computer into
a number. The number enables the computer to connect to the network. If you
enable DNS, you can use your host name (a name to identify your computer on a
local network) plus a domain name or suffix to create an Internet address.
Viewing
your TCP/IP Configuration
Windows
98 includes a diagnostic program for viewing your TCP/IP configuration (see
Figure 8.7). This utility enables you to see not only your IP address but also
your subnet mask and other information that could be critical to your setup.
Figure
8.7 Using Winipcfg to view
your TCP/IP configuration
If
you want to view your TCP/IP configuration, perform the following procedure:
1.
Click Start,
then Run and type winipcfg.
2.
Click OK
to display the IP Configuration
dialog box.
3.
To view additional information about
your TCP/IP configuration, click More
Info.
This
diagnostic program displays current TCP/IP configuration values, including your
IP address, subnet mask, and default gateway. Additional information is also
available, including DHCP and WINS configuration. You can also release a DHCP-provided
IP address, and renew a lease on an existing DHCP-provided address.
Note
DHCP assigned IP addresses are dynamic; that is, the DHCP server assigns
(leases) IP addresses from a finite pool of available addresses, for limited
amounts of time. Releasing an IP address before the lease has expired makes the
address available for assignment to other computers.
Troubleshooting
TCP/IP
If
you are having trouble connecting to your network or communicating with other
computers, either on your network or on the Internet, there are two
troubleshooting utilities you can use to test your TCP/IP configuration: the ping
command or the tracert command.
Troubleshooting
a Connection Using Ping
The
ping command verifies a connection
to a remote host by sending four (by default) ICMP echo packets to the host and
listening for echo reply packets. The ping
command waits for up to one second for each packet sent and prints the number of
packets transmitted and received.
To
test a connection, you can use the ping
command with the following options:
·
An IP address
·
A host name
·
A computer name
If
a ping to a remote host fails, try
to ping your default gateway. If that also fails, either your default gateway is
unavailable or your computer has an improperly configured IP address and/or
subnet mask.
Three
commands you can use are:
·
ping
remote_gateway_IP_address
·
ping
remote_host_name
·
ping
localhost
Localhost
You
can verify that TCP/IP has initialised on your computer by typing ping
localhost. Localhost is a reserved host name that maps to a reserved IP
address (127.0.0.1) that represents your computer. When you type ping
localhost, the messages are local to your computer; no packets are sent to
the network.
If
pinging localhost is successful, you receive four replies from IP address
127.0.0.1. If the ping command is
unsuccessful you will receive a message that says local host is unknown. If this
happens, verify that you installed TCP/IP, and that you restarted the computer
after the installation.
Troubleshooting
a Connection Using Tracert
If
you can ping your default gateway but not a remote host, try the tracert
(trace route) command. The tracert command
displays the Fully Qualified Domain Name (FQDN) and IP address of each gateway
along the route to a remote host. The tracert
commands you can use are:
·
tracert target_name
·
tracert IP address
Document
the information that the tracert
command returns when the remote host is available. Later, if the remote host is
not available, you can compare the information returned by tracert
at that time to the original tracert
report and determine which gateway is unavailable.
Note
If your organization uses a proxy server for access to the Internet, you
may not be able to use ping or tracert
for hosts outside of your intranet.
Configuring
Network Bindings
Because
Windows 98 can support multiple network adapters, protocols, and services
simultaneously, these network components need a way to interface with each
other. To do this, the components use a process called binding, which sets up
communication between the components.
Bindings
are configured between network adapter cards and protocols, and between
protocols and services. By default, all possible bindings are enabled, but you
can optimise performance by modifying bindings. Here are some sample scenarios:
·
Your computer running Windows 98 has
two network adapters. One adapter is connected to a TCP/IP intranetwork; the
other is connected to a NetBEUI network. By default, both TCP/IP and NetBEUI
will be bound to both network cards, even though only one protocol is ever in
use on either network. Disabling the unused bindings can improve your computer's
performance slightly.
·
Your computer running Windows 98 has
one network adapter, and is running both TCP/IP and IPX/SPX-compatible Protocol.
You have also installed the Client for Microsoft Networks for connectivity with
Windows NT servers, and the Client for NetWare Networks for connectivity with
NetWare servers. By default, the Client for Microsoft Networks will be bound to
both TCP/IP and IPX/SPX-compatible Protocol, even though IPX/SPX-compatible
Protocol is used only for connecting to NetWare servers. Disabling the unused
binding may improve your computer's performance slightly.
·
Suppose your computer uses NetBEUI,
TCP/IP, and IPX-compatible Protocol to connect to various type of computers on
your network. You use NetBEUI most often to connect to the computers in your
workgroup. You can make NetBEUI your default protocol by selecting the default
protocol option on the Advanced tab in the Properties dialog box for that
protocol (see Figure 8.8). The default protocol overrides other protocols when
your computer attempts to establish a session with a remote computer. To
optimise performance, you should make the protocol you use most often your
default protocol.

Figure
8.8 The default protocol
setting on the Advanced tab of the NetBEUI dialog box
To
improve performance when you have multiple adapters and protocols, you can
modify bindings between adapters, protocols, and clients. If you want to
configure the bindings for a network component, perform the following procedure:
1.
In Control
Panel, double-click the Network
icon.
2.
On the Configuration
tab, choose the adapter or protocol whose binding you want to modify.
3.
Click Properties
and select the Bindings tab.
4.
Select the appropriate bindings.
5.
Click OK.
Summary
To
use Windows 98 networking features, you must first give your computer a unique
name that other computers on the network will recognize. You then install the
hardware and software that enables your computer to connect to the network, and
configure the protocol that your computer uses to communicate with other
computers on the network. Windows 98 supports a wide range of network types
including Ethernet, Token Ring, and Attached Resource Computer network (ArcNet).
Network protocols supported by Windows 98 include NetBIOS Enhanced User
Interface (NetBEUI), Internetwork Packet Exchange/Sequenced Packet Exchange (IPX/SPX),
Microsoft Data-link Control (DLC), Transmission Control Protocol/Internet
Protocol (TCP/IP), and Fast Infrared Protocol. The Windows 98 implementation of
TCP/IP includes the standard suite of TCP/IP protocols, including Internet
Protocol (IP), Transmission Control Protocol (TCP), Internet Control Message
Protocol (ICMP), Address Resolution Protocol (ARP), and User Datagram Protocol (UDP).
Sharing
Windows 98 Resources
To
share resources on a Windows 98 network, you must set up your computer and other
computers so that they can function in a shared environment. This lesson
discusses sharing Windows 98 resources, including files and printers.
After
this lesson, you will be able to:
·
Install and configure Client for
Microsoft Networks.
·
Configure file and printer sharing.
·
Install and configure a network
printer.
·
Configure the Browse Master.
Installing
Client for Microsoft Networks
On
a Microsoft network, you must have Client for Microsoft Networks installed in
order to enable file and printer sharing. With Client for Microsoft Networks
installed, you can enable sharing, and you can modify the properties of folders
and printers in order to share them.
Client
for Microsoft Networks is a 32-bit, protected-mode network client for Windows 98
that provides network functionality for Microsoft operating systems, including:
·
Windows 98
·
Windows NT
·
Windows 95
·
Windows for Workgroups
·
Workgroup Add-on for MS-DOS
·
LAN Manager network operating system
Client
for Microsoft Networks can use any combination of the following protocols:
·
NetBEUI
·
IPX/SPX-compatible Protocol
·
TCP/IP
If
the setup program detects your network adapter during setup, the program
installs Client for Microsoft Networks by default. You can also install and
configure Client for Microsoft Networks manually.
Figure
8.9 Adding Client for Microsoft Networks
If
you want to install and configure Client for Microsoft Networks, perform the
following procedure:
1.
In Control
Panel, double-click the Network
icon.
2.
On the Configuration
tab click Add
The Select
Network Component Type dialog box appears.
3.
Click Client
and click Add.
The Select
Network Client dialog box appears (see Figure 8.9).
4.
Click
Microsoft, and then click Client for
Microsoft Networks.
5.
Click OK.
After
installing Client for Microsoft Networks, you can allow other computers on the
network to access shared data on your computer by enabling file and printer
sharing for Microsoft Networks.
Configuring
Microsoft File and Printer Sharing
After
you have configured network connectivity, you can share resources among the
Windows 98 computers on your network by installing File and Printer Sharing for
Microsoft Networks.
File
and Printer sharing for Microsoft Networks is based on the Server Message Block
(SMB) protocol, and is compatible with other SMB network operating clients, such
as:
·
Windows NT
·
Windows 95
·
Windows for Workgroups
·
LAN Manager
·
IBM LAN Server
·
DEC Pathworks
You
can configure file and printer sharing using Control Panel (see Figure 8.10.)
Figure
8.10 Enabling file and
printer sharing
If
you want to configure file and printer sharing, perform the following procedure:
1.
In Control
Panel, double-click the Network
icon.
2.
On the
Configuration tab, click File and
Print Sharing.
·
Select the choice(s) you want.
·
I
want to be able to give others access to my files.
3.
I want to be able to allow others to
print to my printer(s).
4.
Click OK.
Note
You
cannot install File and Printer sharing for Microsoft Networks if another
sharing service is already installed. Only one File and Print Sharing service
can be installed at any time.
Sharing
Folders
After
you install file and printer sharing for Microsoft Networks, you can share that
computer's resources with other Windows 98 computers in a peer-to-peer
relationship, or on a Windows NT network.
One
issue you must address is security. When you have shared folders, you will want
to make sure you can adequately restrict access to important resources. You can
choose from two types of access control in Windows 98: share-level access
control or user-level access control.
Share-level
Access Control
When
you implement share-level access control, resource access control is limited to
a password (or passwords) associated with the shared folder or printer. This
type of access control is called share-level access control, and it allows
anyone with the password to access the shared resource. Share-level access
control cannot be implemented on a computer running Windows NT.
User-level
Access Control
On
a Windows NT or Novell NetWare network, you can implement tighter security by
applying user-level access control. With user level access control, you can
designate which users will have access to shared resources and then assign
access rights to those users.
Setting
up a Shared Folder
You
can share folders using Windows Explorer. If want to share a folder, perform the
following procedure:
1.
Open Windows Explorer.
2.
Click the folder you wish to share.
3.
Right-click the folder, and then
click Sharing (see Figure 8.11).
4.
Click Shared As and enter a name for
the shared folder. By default, the Share Name will be the name of the folder,
although you can change this if you wish. You can also enter a comment, which is
displayed when viewing the list of shares on that computer.
5.
Click OK.
Note
if you add a dollar sign ($) to the end of the share name, the share name
will not appear in Windows Explorer. This type of share is called a hidden
share.
Figure
8.11 Sharing a folder in
Windows 98
Assigning
an Access Type to Share-Level Shares
When
setting up a share-level share, you must assign an Access
Type, which can be configured as:
·
Read-Only
·
Full
·
Depends on Password
If
you choose Depends on Password,
specify two passwords: one for users who should be able to only read the
contents of the shared folder, and the other for users who need to modify the
contents of the shared folder.
Unless
you choose Depends on Password, you
do not need to assign a password. If you leave the password entry blank, anyone
will be able to access the shared folder.
Sharing
Printers
When
you share a printer using share-level access control, you can assign a password
to protect it from unauthorized use. Anyone with the password can send documents
to the shared printer. There is only one level of access to a remote printer.
Configuring
a Shared Printer
When
you configure a local printer as a shared printer, other users have access to
the printer. If you want to configure a shared printer, perform the following
procedure:
In
My Computer, double-click the Printers
folder. Right-click on the printer you want to share. Click Sharing. On the Sharing
tab, click Shared As and enter a
share name for the printer. Click OK.
Connecting to a Shared Printer
When
you share a printer, you also share your C:\Windows\system folder, with the
hidden share name printer$. When remote Windows clients connect to your shared
printer, your printer drivers and supporting files are copied from your printer$
shared folder to the remote client's C:\Windows\system folder. The remote client
does not have to provide the drivers manually. This is called Point and Print
installation.
Note
A
Windows 98 client will not query the print server for a new driver each time the
client prints. In order to receive an updated print driver from the print
server, delete the shortcut to the remote printer and add it again.
Installing
and Configuring Network Printers
To
install and configure a network printer, you follow many of the same steps that
are required to set up a local printer. The primary difference is that you
identify a network path instead of a local port for the networked printer.
You
can use the Add Printer icon in the Printers
folder or Point and Print installation to install a network printer in Windows
98.
Using
the Add Printer Wizard
When
you add a printer using the Add Printer
icon in the Printers folder, you must specify that the printer you are adding is
a network printer and provide the network path using a universal naming
convention (UNC) path name for the printer. You must also select the printer
manufacturer and model name. Windows 98 then copies the appropriate printer
driver files to the C:\Windows\system folder.
If
you have applications (such as MS-DOS applications) that must print to a local
port, you can also associate an LPT port with a network path by capturing that
port. Capturing the port means that the MS-DOS program prints to the local port,
where the print job is then redirected to the network printer.
Using
Point and Print Installation
You
can add Point and Print-enabled network printers to your computer without
specifying the manufacturer and model of the printer. If you want to install a
network printer using point and print, perform the following procedure:
1.
Use Network
Neighbourhood or Windows Explorer to
view the computer that is sharing the printer. - Or - Click
Start, Run and type the UNC name of the computer that is sharing the
printer.
2.
Double-click that computer.
3.
Click Start, point to Settings, and
click Printers.
4.
Drag the printer icon from the
computer window to your Printers
folder. - Or - Right-click on the printer's icon to open its context menu and
choose Install.
Printers
shared from Windows 98 computers using file and printer sharing for Microsoft
Networks are automatically Point and Print enabled. Printers shared from Windows
NT servers that are installed as Windows 98 print servers are also Point and
Print enabled. Novell NetWare print servers require some configuration on the
server to successfully use Point and Print.
Note
For
more information about enabling Point and Print, refer to the Microsoft Windows
98 Resource Kit.
Configuring
the Browse Master
When
you explore your Network Neighbourhood or the Entire Network, the list of
computers you see is provided by the Browse Master. The Browse Master is a
designated computer that maintains the master list of computers in a given
workgroup, as well as in other workgroups.
By
default, the Browse Master in a Windows 98 workgroup will be the first computer
that has File and Print Sharing enabled to initialise in that workgroup.
However, you can also configure a Windows 98 computer manually as the Browse
Master.
Figure
8.12 Configuring Browse
Master in the File and printer sharing Properties Window
Tip
Because maintaining the resources list can affect the performance of the
computer assigned as the Browse Master, you may want to change the computer
assigned as Browse Master. You can use a computer that is always on the network,
but is seldom used as a workstation.
If
you want to configure the Browse Master, perform the following procedure:
1.
In
Control Panel, double-click the Network
icon.
2.
On the Configuration
tab in the network components list, select File
and printer sharing for Microsoft Networks.
3.
Click Properties.
4.
On the Advanced
tab, click Browse Master, and then select the Value
you want this computer to have (see Figure 8.12).
5.
Click OK.
Tip
The other option you can
configure for File and Printer sharing for Microsoft Networks is called LM
Announce. You should enable it only when LAN Manager clients need to connect to
your Windows 98 computer. Enabling this setting forces your computer to double
its announcement traffic so that your server will appear to both Windows 98 and
LAN Manager clients. Keeping this setting disabled will help minimize network
traffic.
Selecting
a Value for the Browse Master
The Browse Master Value
setting on the Advanced tab has
three possible values:
·
Enabled:
Specifies that the computer should be the Browse Master. If more than one
computer in a workgroup has this option configured, an "election"
ensues in which one of these computers will be designated the Browse Master.
·
Disabled:
Specifies that the computer should never become the Browse Master. Use this
setting if the computer has little free memory, or if it is connected to the
rest of the workgroup by a slow link and would suffer from poor performance as a
result of providing browse lists to clients.
·
Automatic:
Specifies that the computer may become the Browse Master if the current Browse
Master shuts down, and no computers have the Browse Master setting set to
enabled. If this happens, those computers that have Browse Master set to
automatic perform an election to select a new Browse Master from among that
group. This is the default setting, which is appropriate for most networks.
Lesson
Summary On
a Microsoft network, you must have Client for Microsoft Networks installed in
order to enable file and printer sharing. Client for Microsoft Networks is a
32-bit, protected-mode network client for Windows 98 that provides network
functionality for Microsoft operating systems.
After
you have configured network connectivity, you can share resources among the
Windows 98 computers on your network by installing file and printer sharing for
Microsoft Networks.
To
install and configure a network printer, you follow many of the same steps that
are required to set up a local printer. The primary difference is that you
identify a network path instead of a local port for the networked printer.
By
default, the Browse Master in a Windows 98 workgroup will be the first computer
that has File and Print Sharing enabled to initialise in that workgroup.
However, you can also configure a Windows 98 computer manually as the Browse
Master.
Recommended
Practices Here
are some recommendations for installing and configuring Windows 98 network
components:
·
Create workgroups based on people
who frequently work together, so they can easily share resources in Network
Neighbourhood.
·
Create a logical, consistent naming
scheme for computers to make them easily identifiable.
·
If you are using share-level
security, stress the importance of passwords and security to your users. If you
are using an NT or NetWare network, implement user-level security for more
restricted access.
·
If you are using multiple adapters,
protocols, or services, disable bindings for those components that do not need
to work together in order to increase performance. For instance, you might
unbind TCP/IP from Client for NetWare Networks.
·
Do not enable the Browse Master on
every Windows 98 computer. This can slow down network communications. Instead,
configure one seldom used computer as the Browse Master and leave the setting as
automatic on the other computers.
Summary
The following information
summarizes the key points in this chapter:
Installing
and Configuring Network Components
·
To use Windows 98 networking
features, you must first give your computer a unique name that other computers
on the network will recognize, install the hardware and software that enables
your computer to connect to the network, and configure the protocol that your
computer uses to communicate with other computers on the network.
·
Windows 98 supports a wide range of
network types, including Ethernet, Token Ring, Attached Resource Computer
network (ArcNet), Fibre Distributed Data Interface (FDDI), wireless technologies
(including infrared), and Asynchronous Transfer Mode (ATM).
·
The Windows 98 implementation of
TCP/IP includes the standard suite of TCP/IP protocols, including Internet
Protocol (IP), Transmission Control Protocol (TCP), Internet Control Message
Protocol (ICMP), Address Resolution Protocol (ARP), and User Datagram Protocol (UDP).
Sharing
Windows 98 Resources
·
You must have Client for Microsoft
Networks installed in order to enable file and printer sharing. Client for
Microsoft Networks is a 32-bit, protected-mode network client for Windows 98
that provides network functionality for Microsoft operating systems,
·
To share resources after you have
configured network connectivity, you must install file and printer sharing for
Microsoft Networks.
·
To install and configure a network
printer, you follow many of the same steps that are required to set up a local
printer. The primary difference is that you identify a network path instead of a
local port for the networked printer.
·
By default, the Browse Master in a
Windows 98 workgroup will be the first computer that has File and Print Sharing
enabled to initialise in that workgroup. However, you can also configure a
Windows 98 computer manually as the Browse Master.
Review
The following questions
are intended to reinforce key information presented in this chapter. If you are
unable to answer a question, review the appropriate lesson and then try the
question again.
1.
You are installing Windows 98 on a
computer that will share resources with other Windows 98 computers that are
connected to the network. In addition, you want to use the computer to access
resources on your company's Web servers. Which protocol or protocols should you
configure on your Windows 98 computer? What protocol settings should you
configure?
2.
You want to share a folder that
contains inventory reports that are updated frequently. Four other people in
your department should be able to change the contents of the shared folder;
anyone else should be able to read only the contents. What should you do?
3.
A computer running Windows 98 on the
receptionist's desk has no function other than printing visitor badges for
guests. The computer is connected to the network, and you would like to
configure it to serve as the workgroup's Browse Master. How should you do this?
4.
You need to restart your computer
after installing a new program, but Windows 98 tells you that there are still
users connected to your computer. However, Windows 98 does not tell you who the
connected users are. You would like to view the user names of the connected
users in order to notify them so that they will not lose any data when you shut
down your computer. How can you do this?
5.
Your computer running Windows 98
computer has two network adapters. One adapter is used to connect to the
corporate network, and the other adapter connects to a small NetBEUI workgroup
used by interns. How can you optimize your network bindings for the best network
performance?
Context
Based Servers Reverse
DNS DNS
Terms DNS
Concepts
Setting-up
MS DNS